Showing posts with label Main Course. Show all posts

Monday, January 30, 2012

Wingers Sticky Fingers

For all of you who don't know what Winger's is, well it's a lovely little diner in Utah, Idaho, and a couple other states and they are know for their spicy wings and "sticky fingers".  Their sticky fingers are delicious chicken fingers drenched in their Famous sauce (aka Freakin Amazing Sauce).  This sauce really does live up to its name of being Freakin Amazing!

I wanted to share my version of these delectable little bites with you because I think these would be a great appetizer or dish to share with friends for the upcoming super bowl.  I made homemade chicken fingers which were super easy and very affordable, but if your in a time crunch you can always use breaded frozen chicken tenders also.

Recipe:
For the Chicken Tenders:
2 boneless skinless chicken breasts
2 cups panko bread crumbs
season salt
1/2 cup flour
1 egg
1/2 cup milk
salt & pepper

For the Sauce:
3/4 cup Franks Hot Sauce (HAS to be Franks!)
1-1/2 cups brown sugar
1/4 cup water
2 Tbsp. Honey

Preheat your oven to *350.  Line a baking sheet with lightly greased foil.

Trim the chicken of any fat.  Slice the chicken widthwise into 6-8 strips.  In 3 seperate bowls, combine the flour and a little salt in the 1st bowl, whisk together egg and milk in the 2nd, and combine the panko bread crumbs and seasoning in the 3rd.  Take each strip and dip into the flour, then egg wash, then dredge in the bread crumbs. Repeat with each strip.

Bake the strips for 25-30 minutes.  While the chicken is baking combine all the ingredients for the sauce together and set aside. 

As soon as the chicken is done baking, pour sauce over each chicken tender till they are completely covered with sauce.  Serve with a side of celery and extra sauce for dipping.

*We like to combine some of the Freaking Amazing Sauce with some Ranch and you've got yourself some Creamy Freaking Amazing Sauce, which Seriously is AMAZING!!!


Recipe Source: Me

Friday, January 27, 2012

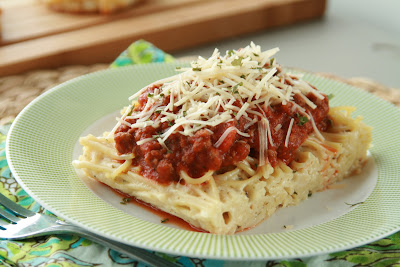
Spasagna

So this pregnancy I haven't had any crazy cravings like you hear some people have.  Like craving laundry detergent, pickles everyday, or I've even heard of some ladies craving dirt?!!!! Weird I know!  But one thing that I have found myself wanting to eat on a regular basis is Spaghetti. 

I absolutley love the combination of marinara and brown butter with mizithra cheese that they have at Spaghetti Factory.  I actually made a version of it the other day that I will share with you at a later time.  But I have to say that this version of spaghetti has become one of our families favorties!  I got the recipe from one of my good blogging buddies Brandie over at The Country Cook. Can I just say that Brandie has so many delicious and quite easy to make recipes that always has me coming back to her blog on a regular basis.  This dish is so full of flavor, so easy to put together, and will easily feed a family of six.


Recipe:
1 lb spaghetti noodles
1 (26oz) jar of your favorite marinara sauce
1 (16oz) jar favorite alfredo sauce
1 lb ground beef or ground turkey
1/2 cup milk
2 cups shredded mozzarella
1 tsp. dried oregano
1 tsp. dried parsely flakes

Cook spaghetti as directed on package.  Preheat oven to *350.  In a large bowl combine the alfredo sauce, milk, shredded cheese, and spices.  When noodles are done cooking, drain them completely then mix them into the alfredo mix.  Lightly grease a 9x13 baking dish and pour the noodles into the pan, cover with foil, and bake for 30 minutes.

While the noodles are baking, cook up the meat till no longer pink.  Drain meat of any excess fat then return to pan.  Stir in the marinara sauce and heat through. Cover and keep on low heat till noodles are ready.

After noodles are done baking, let them sit for about 5-10 minutes.  Cut the noodles into squares and top with some of the marinara meat mixture and sprinkle a bit of parmesan cheese over the top.  Serve with a green salad and some french bread!

Recipe Source: Brandie @ The Country Cook


Tuesday, January 24, 2012

Baked Coconut Chicken Tenders w/a Sweet Chili Sauce

I came across this recipe on Pinterest and knew at once I had to try it! These chicken strips were super tender and full of flavor!  The original recipe had you fry the strips in oil but I decided to bake mine to make them a little more healthy and I feel like they turned out great! The crust was still very crispy, and the chicken was super tender. 

I lined the baking sheet with foil to allow the bottom side of the strips to crisp up and it worked like a charm.  I definitely suggest you make these asap! They are a fun and delicious change to your typical weeknight meal and i'm sure your family will love them!


Recipe:
2 boneless skinless chicken breasts
2 eggs
1/4 cup coconut milk
1/2 cup flour
1/2 tsp. salt
1 cup Panko bread crumbs
1 cup shredded coconut
1 cup Sweet chili sauce


Preheat your oven to *350.  Line a baking sheet with foil and lightly spray with cooking spray.  Trim the chicken of any excess fat then slice it into 6 even strips widthwise.  Next, take 3 seperate bowls and combine the flour and salt into the first bowl.  Whisk together the eggs and coconut milk into the 2nd bowl.  Then lastly, combine the bread crumbs and shredded coconut together. 
Take each chicken strip and dip it into the flour mixture, then dip it into the egg mixture, and lastly dredging the strips in the coconut/bread crumb mixture.  Place the coated strips onto the lined baking sheet and bake for 25-30 minutes.
Serve with sweet chili sauce to dip in.(You can purchase this sauce in the asian section at your local grocery store).  We also used ranch and honey mustard for dipping sauces also and they were just as delicious :)

Recipe Source: Pinterest

Wednesday, September 14, 2011

Inspiration...

I totally need a push and a shove back into cooking!  I have been super exhausted!  I really have not been consistent with cooking ever since a couple of weeks before we moved.  My poor husband! That's a long time to not be cooking! Well, obviously since I haven't cooked much lately I thought I would share some recipes that literally have had me drooling forever and cannot wait to try!!!

First off, these Gorgonzola Steak Rolls have had me wanting to take a bite out of the screen ever since I layed my eyes on them! Holly over at Life as a Lofthouse made these and I cannot wait to give them a try.

(Photo via Life as a Lofthouse)

This Basil Chicken Coconut Curry from Mels Kitchen Cafe looks and sounds absolutely delicious and I love that it doesn't require all these crazy ingredients that I have never heard of that many curries do.

(Photo via Mels kitchen Cafe)
I just came across this Baked Ziti tonight over at Claire's  lovely blog and I am already planning my trip to the grocery store tomorrow to make it for dinner!

(Photo via Claire Cooks)

I absolutely LOVE the combination of chocolate and coconut and these Coconut Macaroon Brownies by Haley over at The Girly Girl Cooks have reeled me in for sure!

(photo via The Girly Girl Cooks)


Now I am not much of a seafood fan but Holy Wow this Herb Glazed Salmon by Megan at the blog Wanna be a Country Cleaver has me totally intrigued!!!

(Photo via Wanna Be a Country Cleaver)

I love me some pasta salad and when I came across this recipe for a BBQ Pasta Salad over at Kathy's blog Gonna Want Seconds I have not stopped thinking about it since and am wondering why I still haven't gotten my tired butt up to make it!  This would be a great side dish to any meal!

(Photo via Gonna Want Seconds)


Well you all, I hope these recipes are as inspiring to you as they are to me!  I can't wait to get back in the kitchen and try a few of these delicious looking recipes and to start cooking regular meals again! 

Tuesday, August 23, 2011

Shepards Pie

So lets be honest, Shepards Pie really isn't the most photogenic food, but it sure does taste good!  To me it is a total comfort food and it's a cinch to put together.  A prefect meal for those nights that you don't have much time to spend in the kitchen, yet you want something tasty and comforting.  

I decided to give this recipe a little "Kick" with spicing things up a bit.  Instead of only using Tomato Soup for the sauce, I added some ketchup and BBQ sauce and switched up the usual green beans and corn with a bell pepper and onion.  The Hubs and the L.O. loved it so I know its a keeper.  Give it a try and let me know what you think! 


Recipe:
1 pound lean ground beef (or ground turkey)
1 bell pepper (diced)
1/2 onion (diced fine)
3 large potatoes (peeled and mashed)
1/4 cup sour cream
4 Tbsp. Butter
2-3 Tbsp. Milk
1 (10 oz) can tomato soup
4 Tbsp. ketchup
3 Tbsp. BBQ sauce (I used sweet baby rays)
1 cup Cheddar Cheese (shredded)
Salt & Pepper 

Preheat the oven to *350.  

In a large saute pan, season the meat with salt and pepper then brown the meat till no longer pink.  When done cooking, drain any excess fat and set aside.

While the meat is cooking, peel and cube the potatoes and place into a large pot of boiling water.  Boil till potatoes are tender and ready to be mashed (about 12-15 minutes).  Drain the potatoes then add in the butter and mash till lumps are gone.  Add in the sour cream, milk, and a dash of salt & pepper and mix till smooth.

Next, dice up the pepper and onion and place into the saucepan with the meat.  Add in the soup, ketchup, and BBQ sauce and stir till well combined.  Place the meat mixture into a lightly greased 9x13 baking dish then spread the mashed potatoes on top of the meat.  Finish by sprinkling the cheddar cheese over the top of the potatoes.  

Place in the oven and bake for 25-30 minutes.  Enjoy!!!


Wednesday, August 3, 2011

Italian Pork Chops

For my birthday last year, my mother gave me a copy of this wonderful cookbook Family Comfort Favorites by Kim Warren.  This recipe book is FULL of Kim's family's favorite recipes.  I don't know about you, but I love when one of my friends shares with me one of their families secret recipes!  Recipes that are passed down from generation to generation are always keepers in my book!  And I feel that this book is just that!  I have tried many of her recipes and so far I have yet to be let down.  

I have made these Italian Pork Chops a few times since I got this book, and can I just say that they are soooooo good!  My whole family has loved them too!  Plus you throw them in your crock pot and let the slow cooker do all the work for you :)


Recipe:
4-6 Bone-in pork chops
1 (14oz) can Tomato Sauce
1 clove garlic (minced)
1-1/2 tsp fresh Oregano (or 1/2 tsp. dried)
1 red bell pepper (chopped)
1 yellow or orange bell pepper (chopped)
8-12 large button or crimini mushrooms
4-6 large slices Fresh Mozzarella cheese (1 for each pork chop)
Garlic Powder
Onion Powder
Salt & Pepper 

Generously season pork chops with the garlic & onion powder, and salt & pepper.  In a large saute pan, brown both sides. (about 1-2 minutes per side)  Place the chops into the slow cooker.  

In a small bowl, combine the tomato sauce, garlic, oregano, and a pinch of pepper.  Pour over the top of the chops, cover and let cook for 7-8 hours on low.

Seed the peppers, and cut into 6-8 slices.  Clean and stem the mushrooms.  With 1-2 hours of cooking time remaining, add peppers and mushrooms to slow cooker.  Lastly, with 5-10 minutes of cooking time left, place 1 slice of fresh mozzarella on top of each pork chop and replace the cover allowing the cheese to melt.  

To serve, top each pork chop with some peppers and mushrooms and some of the tomato sauce form the pot and serve with rice.  Enjoy!

Wednesday, July 27, 2011

Beef Stroganoff

For some reason I always had something against beef stroganoff!  I just didn't love the flavor of the sauce I guess, so my poor husband was deprived of one of his favorite dishes.  That's until my friend Mal gave me her Grandmas secret recipe and I knew that if Mal loved it I would probably like it too!  Her and I have always had similar likes when it comes to food.  We used to share a little caesars pizza on a regular basis back in high school (sad I know), we would drive miles just to get some of the best peanut butter chocolate fudge that Utah had to offer, and we constantly are swapping recipes! I have gotten some of my favorite recipes from her.  Thanks Girl :) 

I know you guys will all adore this recipe!  It is a bit different from your typical stroganoff, which I like :), it has a tomato base to the sauce which gives it a great flavor, and some heavy cream, which always makes things taste extra good.  This is one of those heavier dishes, so I only make it on special occasions.  Give it a try and let me know what you think!  I'm sure you'll love it!

Recipe:
(This recipe will serve about 8-10 people.  I usually cut it in half unless were entertaining)
1 cup butter
1-1/2 cup onion (diced)
1-1/2 cup mushrooms (sliced, and optional)
3-1/2 pounds Beef Top Round (sliced into thin strips)
6 Tbsp. Flour
3 cups beef broth (I use 3 beef bouillon cubes and 3 cups boiling water when I don't have the broth on hand)
1-1/2 tsp. salt
6 Tbsp. Tomato Paste
2 Tbsp. Worcestershire sauce
1-1/2 cup Heavy Cream
3/4 cup Sour Cream
1 pound Egg noodles

Melt 1 stick (1/2 cup) butter into a large saute pan. Saute the onion and mushroom till soft then remove from pan and set aside.  Add the other 1/2 cup of butter to the pan and allow it to melt.  Dip the beef into the flour then place into the pan and allow it to brown on both sides. (about 2-3 minutes per side)

Next add the broth and the salt to the meat and bring to a boil.  Once it reaches a boil, lower the heat and simmer for 1-1/2 to 2 hours, allowing the meat to become tender.

After simmering for a couple of hours, turn the heat up to medium and stir in the onions and mushrooms and the remaining ingredients.  Stir for a few minutes till heated all the way through.  Serve over egg noodles or rice.  Enjoy!


Friday, July 15, 2011

Fajita Quesadillas

This was by far one of the easiest, tastiest, and quickest lunches I have had in a while!  Don't you just love those meals that you can throw together in less than 15 minutes, yet it tastes like you put lots of effort into it?  Well my friends these Quesadilla's are just that!  

One thing I love about Quesadillas is there are so many different flavors that you can stuff inside of them.  Like sweet and spicy chicken or BBQ chicken, but I think that these fajita quesadillas my just be my favorite so far!

Recipe: (Yields 4 Quesadilla's)
2 Tbsp. olive oil
2 boneless skinless chicken breasts (sliced into thin strips)
1 pkg Fajita Seasoning
1 green bell pepper (sliced into thin strips)
1/2 red onion (sliced into thin strips)
1 large garlic clove
1 (14oz) can refried beans (you could use black beans also)
1 tsp. Cumin
1-1/2 cups sharp cheddar cheese (shredded)
8 fajita sized tortilla

Heat 1 Tbsp oil in a large skillet over medium heat.  Slice the chicken into thin strips and season with the fajita packet.  Cook chicken till no longer pink in the center (about 6-8 minutes).  When the chicken is done, remove it from the pan and set aside.  

Take the remaining oil and place it into the pan you just cooked the chicken in.  When the oil is heated, place the onion and pepper in and saute for about 3-4 minutes.  Now toss in the minced garlic and cook, stirring frequently, for another minute or two.  

While the veggies are cooking,  place the beans and cumin into a bowl, and microwave for 30 second intervals 3-4 times, stirring in between each cycle.  

To assemble, spray the bottom of a skillet (I just wash out the one I cooked the veggies and chicken in) with cooking spray.  Then take about 2 tbsp. of beans and spread them on the first tortilla, topping with a l/3 cup of cheese, some veggies, and chicken, and top off with the other tortilla (spraying the top of that with cooking spray so when you flip it, it doesn't stick to the pan)  You can also put tomatoes, sour cream, corn, pico de gallo, guacamole, or some salsa inside too, to add some extra flavor! Enjoy!


Wednesday, July 13, 2011

Chicken Carbonara

I have been searching for a good Carbonara Recipe since I can remember!  After much searching and not finding anything that I was very pleased with, I decided to make up my own and the results I must say were quite good!

I wanted something a bit spicy but full of flavor and I feel that this was the best of both worlds.  If your not a spicy fan, that's totally fine just omit that part and I think you should still have great results!

Recipe:
2 large boneless skinless chicken breasts 
1/4 cup Olive Oil
1 pound Linguine Noodles
4 cloves garlic (minced)
1/2 of a red onion (diced)
1/2 cup bacon (diced)
4 (oz) jar diced sun-dried tomatoes
1/2 cup mushrooms (sliced)
2 whole eggs
1/2 cup Smoked white cheddar (shredded)(should be able to find this in your cheese section of your local grocery store)
1/4 cup white cheddar (shredded)
1/4 cup parmesan cheese (shredded & divided)
1 cup chicken Stock
1/2 cup Heavy Cream
1/2 tsp. cayenne pepper
1 Tbsp. Ground black pepper
salt to taste

Place the olive oil into a large saute pan over medium heat.  Place the diced onion into the oil and saute for a few minutes.  Add in the chopped up bacon and stir till the bacon is slightly crisp.  Toss in the minced garlic and stir till the garlic becomes fragrant.  Remove from heat and place onto a paper towel lined plate.

Return the pan to medium heat and add the diced chicken to the bacon grease and cook till no longer pink in the center (about 8-10 minutes).  While the chicken is cooking, bring a large pot of water to a boil and toss the linguine in the boiling water and cook for 8 minutes (till al dente).

While the noodles/chicken are cooking, take a large bowl, one that the pasta will be served in, and crack both of the eggs into it.  Whisk together the eggs, pepper, cheese, and cayenne pepper.  Set aside.

When the chicken is done cooking, remove it from the pan.  Place the pan back over the heat for 30 seconds then add in the chicken broth (it may sizzle a bit but that's what you are going to want. It will pick up all the yummy bits of bacon and flavor on the pan and add it to the sauce.  To the broth, add back the onion/bacon mixture, toss in the sliced mushrooms, sun-dried tomatoes, and the heavy cream and let simmer for a few minutes.

As soon as the noodles are done cooking, drain any excess water, and immediately add the HOT noodles to the egg mixture and give it a good toss.  When the vegetables and broth are done simmering, pour over the noodles, throw in the chicken and stir till all is well combined.  Top with parsley and freshly grated parmesan cheese  Enjoy!

Sunday, July 10, 2011

London Broil

So this picture really doesn't do this meat any justice! I HATE when I don't have much daylight to work with for my photos.  But just trust me when I say that we ate this meat up like it was going out of style!  It was tender and SO full of flavor that we will definitely be making this dish again and again!

This london broil is perfect for the current grilling season too.  All you have to do is let it marinate for a couple of hours, (or overnight) throw it on the grill, cook it for a few minutes per side, and you've got yourself one TASTY MEAL!


Recipe:
1-2 pounds of London Broil (Beef Flank steak or a Top Round Steak; I used a Top Round)

For the Marinade:
1 tsp of ground ginger
1 tsp of ground mustard
3 cloves of Garlic (minced)
1 Tbsp Brown Sugar
1/2 cup soy sauce
1/4 cup vegetable oil

Whisk together all the marinade ingredients in a small bowl.  Place the meat in a glass pyrex bowl and pour the marinade over the top of the meat.  Let the meat marinate either overnight (preferred) or for at least 4 hours.

Heat your grill to *350 and cook for 6-8 minutes per side.  Let the meat rest for a few minutes after cooking.  Serve with this pasta salad, or with this great creamy noodle bake, or with these delicious sauteed veggies.


(Recipe Source: Tasty Kitchen)


Thursday, June 30, 2011

Oven Baked Ribs and a Festive Dessert Perfect for the 4th of July.

Who ever knew that Baby Back Ribs could be so easy and SO Delicious!  These were so easy to make that I think I just might whip some more of these up for the holiday this weekend.  Since we live in an apartment right now, and do not currently have a grill right outside our back door, these brought the flavor of the grill that I was looking for and INSIDE the comfort of my home.  I served our ribs with twice baked potatoes that were equally just as delicious! They paired perfectly together.

Now if you are looking for a great dessert for the 4th of July, well, look no further because this strawberry shortcake is so tasty and Oh so Festive!

Recipe for the Ribs:

1 rack of Baby Back Ribs
1 Tbsp. of Weber Smokey Mesquite Seasoning
1 (18oz) bottle of Sweet Baby Rays hickory Brown Sugar Bbq Sauce 

Place the rack of ribs in a 9x13 baking dish.  Sprinkle the ribs with the Weber Seasoning.  Pour half of the bottle of bbq sauce over the ribs and cover the dish tightly with tin foil and place in the oven @ *400 and bake for 90 minutes.  When the 90 minutes is up remove the foil, pour the remaining bbq sauce over the top of the ribs, and place back into the oven and bake for 15 more minutes.  Serve with twice baked potatoes or a green salad.

For the Red White & Blue Strawberry Shortcake:
For the Shortcakes/Biscuits: (*Note if you just want biscuits only use 1 Tbsp. sugar)
2 cups Flour
4 tsp. Baking Powder
3 Tbsp. Sugar
1/2 tsp. salt
1/2 cup butter
3/4 cup milk
1 egg

For the Cream:
1 pint of heavy Cream
2-3 cups of powdered sugar
1 tsp. Vanilla Extract
1 container of blue food coloring

Combine all of the dry ingredients together in a large bowl.  Using a pastry cutter, cut in the butter till the mixture becomes crumbly.  Beat together the egg and the milk and stir into the dry ingredients and stir till barely blended.  Drop 3-4 Tbsp. of the dough onto a lightly greased or lined baking sheet.  Bake @*400 for 10-12 minutes or until the tops are lightly browned.  Let cool completely before arranging the shortcakes.

Beat together the heavy cream, vanilla, powdered sugar, and blue food coloring till stiff peaks form.

Take the cooled shortcakes and slice them in half.  Layer the cream, then strawberries, then the other half of the biscuit, and then top off with another dollop of cream.  Enjoy!

I hope you all have a Wonderful 4th of July weekend!!! 


Tuesday, June 14, 2011

Taco Casserole

I was going through some of my old photos, and realized that I had forgotten to post about this delicious casserole.  It may have been because this photo really doesn't do the dish justice, but trust me when I say, This dish is good!

It's super simple to throw together, and most of these ingredients I am sure most of you have on hand right now.  This is the perfect meal for those nights that you are either in a hurry or don't feel like slaving away in the kitchen.

Recipe:
1 pound Lean Ground Beef
1/2 of an onion (diced)
1 (1oz) pkg. of Taco Seasoning
1 (14oz) can Whole Kernal Corn (drained)
1 (10oz) can Rotel Tomatoes (not drained, if you like things spicy use HOT Rotel Tomatoes)
1 (14oz) can Black Beans (drained)
1 cup Cheddar Cheese (shredded)
1 pkg. of Cornbread (prepared but not baked; so you will also need the ingredients for the cornbread, I'm pretty sure you will need an egg and some vegetable oil. The portion amounts will differ due to the brand of cornbread you use also.)

In a large skillet over medium heat, saute the onion and beef. When the meat is done cooking place on a paper towel to drain any excess fat.  Next in a bowl, mix together the taco seasoning, corn, rotel, cheese and beans. Now add in the cooked meat and stir till everything is well combined.  

Pour the meat mixture into a lightly greased casserole dish or an 8x8 dish.  Prepare the cornbread as directed on package and pour over the top of the meat/bean mixture.  

Bake @*425 for 20-30 minutes or until the cornbread is lightly golden brown.  Serve with salsa and sour cream.

Wednesday, June 8, 2011

Balsamic Chicken Pasta Salad + A Guest Post over @ The Country Cook

This pasta was so light and so delicious that I am thinking about going back for thirds right now! Yes, you heard it, I said thirds :) Not seconds, THIRDS! :)  

I came up with this dish while I was at Costco, shopping around, buying way more than I needed to.  What is it about Costco? I mean I really can't go in there and NOT spend under $100!  Do any of you have that same problem. I mean I went there on the intentions of only buying diapers and I came out with, diapers, wipes, water, raspberries, hummus, pajamas for the little one, salad, milk, some cheese, a huge thing of balsamic vinegar, a rotisserie chicken (those things are deadly good!), some ribs for fathers day, fruit snacks, crackers, cherry tomatoes, and last but DEFINITELY not least, 2 loaves of rosemary bread! So much for only buying diapers Ha... 

Anyways, I was on a major Italian kick and that's when this pasta popped into my mind.  Lets just say that I am glad it was so good cause when you buy most of the ingredients from costco, you are bound to have one Large dish!

Also, check out my Guest Post over @ The Country Cook today!  I feel so blessed and lucky to be a guest post twice this week and on 2 of my favorite and AMAZING blogs. Brandie is one of the sweetest people that I have met through this whole blogging process and I KNOW FOR A FACT, that any of you out there that know her, would definitely agree with me!  Check it out and check out Brandie's awesome blog! She is the one to thank for these amazing Pork Chops in/a Creamy Gravy that I have on my blog! Thanks again Brandie, I had a blast :)

Recipe:
2 cups Shredded Chicken (I used a rotisserie chicken, made it that much easier to throw together)
1 lb. Penne Noodles (this is all I had on hand, you could use Linguine, bowtie, spiral, etc.)
1 cup of cherry tomatoes (chopped)
8 oz. Fresh Mozzarella (diced into cubes)
2 large Garlic Cloves (minced)
3 Tbsp. Balsamic Vinegar
6 Tbsp. Olive Oil
1 cup of fresh Basil (chopped)
1/2 tsp. of Salt 
1/2 tsp. pepper

Cook the noodles as desired on package.  While the noodles are cooking, shred the chicken into bite sized pieces, dice up the tomatoes, and mozzarella cheese and place all these ingredients into a large bowl and set aside.  

In a small bowl, whisk together the vinegar, garlic, salt and pepper. Slowly mix in the oil. Chop up the fresh basil and pour 1/2 cup of it into the sauce. Whisk for 1 minute.

When the noodles are done cooking, drain, and place them into the bowl with the chicken.  Add in the remaining basil and pour the dressing over the noodle/chicken mixture and toss till everything is well combined.  Serve with a slice of warm bread. (Costco's Rosemary Bread goes great with this dish!)

Wednesday, June 1, 2011

Spicy Pork Chops

(please excuse the horrible lighting! We ate late this night)
These pork chops were so so yummy! They had so many delicious flavors going on all at the same time! They were spicy but then there were hints of honey, then you would bite down into a big piece of bacon and well, the rest is just history. They were absolutely delicious and were great for changing up the menu a bit.

Recipe:
4 bone in pork chops
4 slices of Bacon (chopped into bite sized pieces)
1/2 of a whole onion (diced)
3 cloves of garlic (minced)
1/3 cup soy sauce
3 Tbsp. lemon juice
2 Tbsp. Honey
1 1/2 tsp. chili powder
3/4 tsp. curry powder

Slice the bacon into bite sized pieces then cook it over medium heat till crisp.  Place the cooked bacon onto a paper towel to drain any excess fat.  KEEP the bacon grease in the pan! Next, take your pork chops and place them into the large skillet with the bacon grease. You are going to brown them on both sides for about 5 minutes pser side.  

Combine the soy sauce, honey, lemon juice, garlic, chili powder, and curry powder all together in one bowl.  Pour over the pork chops. Place the diced onion and bacon over the pork chops then cover the pan, turn the heat to low, and simmer the chops for 30-35 minutes.  Serve with rice.

Thursday, May 26, 2011

Chicken Cordon Bleu

I love Chicken Cordon Bleu. I always have and I always will.  I think it may have something to do with the fact that cheese oozes out of the center of a nice and tender piece of chicken and then its rolled in crunchy bread crumbs and topped off with a delicious Hollandaise Sauce. I don't know that usually ALWAYS sounds good to me! How bout you? Not to mention that it is one of the easiest dishes to put together to!

Recipe:
2-4 boneless skinless chicken breasts (flattened to about 1/8"-1/4" thick)
2-4 Slices of thick sliced deli ham (or if you've recently made a ham like this one you could slices of that also)
2-4 slices of Swiss Cheese (or if you don't have swiss cheese on hand I really like smoked cheddar also)
1 1/2 cup Panko Bread Crumbs
Dash of Garlic Salt & Season Salt
3 Tbsp. Butter (melted)

Flatten the chicken breasts to about 1/8"thick.  Take 1 slice of ham and top with 1 slice of swiss cheese and roll up so that the cheese is rolled onto the inside of the ham.  Take the rolled up ham/cheese roll ups and roll 1 chicken breast around each one and pin the edges of the chicken together with toothpicks.  Take the bread crumbs and lightly season them with the garlic salt and season salt.  Take the chicken roll ups and roll in the melted butter then dredge them in the bread crumbs till all sides of the chicken are completely covered in crumbs.  Bake @*375 for 1 hour

Top with hollandaise sauce OR take 1 can of cream of chicken soup and 1/2 cup of sour cream mix it together and spoon over the top.

Monday, May 23, 2011

Oven Baked Stew

I had been wanting to make beef stew for awhile now! I know, it's like practically summer where I am right now, but I have just been craving some major comfort food lately, and well, Beef Stew fell right into that category for me.  You'll come to realize with me that when it comes to food, Well, there really are no rules.

Like for example, I could eat pumpkin crumble any time of the year! It doesn't have to be Fall time for me to break out pumpkin desserts.  And as far as soup goes, well, I like a good soup now and again even if it is in the middle of the summer.

So when I came across this recipe over @ The Girl Who Ate Everything I knew at once that my craving was going to be fulfilled. And fulfilled fast too, cause boy, was this recipe a cinch to throw together!

GIFT CARD WINNER ANNOUNCED HERE!

Recipe:
1 (1oz) pkg of Dry Onion Soup Mix (I use the Lipton brand)
1/2 tsp. Salt
1/2 tsp. Paprika
1 pound of lean Beef Stew Meat (cut into bite sized pieces)
1 can Cream of Celery Soup
1/2 cup Ketchup
2 medium sized potatoes (peeled and diced into bite sized pieces)
3 large carrots (peeled and diced)
1/2 of an onion (diced)

In a large bag, combine the seasonings and stew meat and shake until all the meat is well seasoned.  Place into a lighlty greased casserole dish and top with the sliced potato, carrots, and onion. Next mix together the ketchup and soup and pour over the top of the stew.  

Cover the casserole dish with a lid if it comes with one (if not, then just cover with foil) and bake @ *325 for 2 hours.  Serve with warm bread or a roll for dipping! 

(recipe source: The Girl Who Ate Everything)

Tuesday, May 17, 2011

My Dad's Famous Taco's

My dad can whip up some majorly "Mean" tacos! And when I say "Mean" I mean amazing! They are so simple and so good that they always have you asking for seconds! 

I don't know if I have ever mentioned, but my dad, well he's a pretty good cook! And I'm not just saying that because he is my dad. He really can cook! He is one of the best BBQ'ers that I have ever met. He can make the best smoked ribs, amazing steaks, chicken n dumplings, and well, these tacos! 

One thing that I love about these tacos, is that they don't require a ton of different spices and seasonings, yet they are so fresh and flavorful, that like I said before, you will definitely, be asking for seconds!

Recipe:
1 pound ground beef (I used 93/7)
1 head of iceberg lettuce (washed and chopped)
3-4 Roma Tomato's
1/2 of a red onion (diced)
2 garlic cloves (minced)
1 1/2 cup Cheddar Cheese (shredded)
Salt and Pepper
10-12 Corn Tortillas
Olive Oil

Place the ground beef, garlic and salt and pepper into a large saute pan. Cook over medium heat till the meat is no longer pink (about 5-8 minutes).  Then wash and slice all of the vegetables and set aside.

When the meat is done cooking, drain any excess fat and quickly wash the pan. (You will use this pan to heat up your tortillas)  Now in a large bowl, combine the meat, vegetables, and cheese and toss together till it is all well combined.  

Now drizzle about 1 Tbsp. of olive oil into your saute pan.  Place 1-2 tortillas into your pan and let them heat up over low-medium heat.  (you will need to add olive oil in between cooking each tortilla) When you flip the tortilla over lightly salt one side of the tortilla. (this just gives it an added touch of flavor).  Place about 2-3 Tbsp of your meat/veggie mixture into each tortilla. Top off with your favorite hot sauce and Enjoy!

Monday, May 9, 2011

Pulled Hawaiian BBQ Chicken Sandwiches

I love more than anything when I come across a new recipe that involves the crock pot! Seriously, you throw a couple of ingredients into a large pot, plug it in, turn the heat to low, and VOILA! Your meal is ready for you and you didn't have to slave in the kitchen for hours over it either.  I saw this recipe on Tasty Kitchen the other day and knew at once that was going to be our dinner the next day.  I made just a few changes to the recipe that I feel added just a bit more flavor. That is the recipe you will find below but if you would like the original click here.

Recipe:
2-3 large boneless skinless chicken breasts (not frozen)
1 can of Pineapple tid-bits (reserve 1/2 cup of the juice)
1 small onion (diced)
1 clove of garlic minced
1 bottle of BBQ sauce ( I used Sweet Baby Rays Honey BBQ, but you can use whatever flavor you would like)
1 Tbsp. Honey
1/2 cup pineapple juice
1/2 tsp. Ground black pepper

Place your thawed chicken breasts into the crock pot.  Dice the onion and place on top of the chicken. Next layer the pineapple over the onion.  In a bowl, combine the bbq sauce, garlic, pepper, honey, and juice and pour over the chicken. Cover the crockpot and cook on low for 6-8 hours.  Serve on toasted buns.

(Recipe Source: Slightly adapted from Tasty Kitchen)


Friday, April 29, 2011

The Best Sweet & Sour Chicken Ever

Seriously, the title says it all!  This sweet and sour chicken tastes like you got it straight out of a Chinese Restaurant and it was super easy to make!  To be honest, I wasn't even planning on making dinner last night, and decided at the last minute that "Ok, I guess cereal isn't going to fill up the hubs for dinner tonight!" so I whipped up a dish of this deliciousness and we were in chinese heaven!  From the amazingly breaded chicken to the mouth watering sauce, really this dish is a must make, on a regular basis, if you ask me!
Oh and Ham-A-Rama week finally came to an end today, when the 10 pounder finally had nothing left to give :( We ended the crazy week with a lovely ham and cheese omelet for breakfast that I sadly forgot to take a picture of.  Hope you all enjoyed all the ham recipes.  Now on to the star of the show,
Sweet and Sour Chicken!

Recipe:
For the Chicken:
2-3 boneless skinless chicken breasts
1 cup Cornstarch
2 eggs (slightly beaten)
salt and pepper (to season the chicken with)
1/4 cup Oil for frying ( I used Peanut Oil )

For the Sauce:
3/4 cup Sugar
4 Tbsp. Ketchup
1/2 cup Vinegar
1 Tbsp. Soy Sauce
1 tsp. Garlic Salt

Cut the chicken breasts into bite sized pieces.  Season well with salt and pepper.  Next dip the chicken in to the cornstarch then into the egg mixture.  Place into a large skillet with the heated oil and cook the chicken till lightly browned, but not cooked through all the way. 

Combine all the ingredients for the sauce together.  Now place the chicken into a baking dish (9x13) in a single layer, and pour the sauce mixture over the top.  Bake @ *350 for 45 minutes; 
rotating the chicken every 15 minutes.  We like things extra saucy, so we just made up another batch of sauce and simmered over low-medium heat for 6-8 minutes.  Serve over rice or noodles.  

(Recipe Source: Mels Kitchen Cafe via Tasty Kitchen)

Tuesday, April 26, 2011

Ham & Cheese Sandwich-Quiche Style

Leftover Ham-A-Rama Recipe #1!
So as you all know I made a HUGE ham on Sunday and am trying to use up every last bit of it.  I love me some good old ham and cheese sandwiches but I wanted to be a bit more creative so I turned my typical ham and cheese sandwich into a ham and cheese quiche that the whole family can enjoy. This recipe is perfect for Breakfast or Dinner. I made mine for dinner last night and also had me a slice for breakfast today! How nice is that! 2 meals out of one dish. Gotta love that! 


Recipe:
1 unbaked Pie Crust (I homemade mine click here for recipe)
1 1/2 cup Ham (chopped into small bite size pieces)
1/4 cup Onion (minced)
2 cups Cheddar Cheese (shredded)
5 Eggs 
2 cups of Heavy Cream (or whole milk)
1/2 tsp. Salt
1/4 tsp. Sugar

Preheat the oven to *425.  Sprinkle the ham, onion, and shredded cheese into the bottom of the pie crust.  In a large bowl,  mix together the eggs, cream, salt, and sugar.  Pour the egg mixture over the ham in the pie crust.  Place the quiche in the oven and bake for 15 minutes.

Next, turn the temperature on the oven to *300. Place a pie shield over the edges of the crust to avoid burning, and return the quiche back into the oven and bake for another 30-35 minutes.  The quiche is done when a knife, stuck into the center comes out clean. 
Related Posts Plugin for WordPress, Blogger...