Thursday, June 6, 2013

Cake Mix Cookies with a Triple Chip

I will never forget when we had a barbeque with our Neighbors a few months back,
she brought the most divine cookies that were so soft, moist, and full of different types of chocolate chips.  I knew I had to get my hand on the recipe.
I would have never guessed that they were made from a cake mix either.  Even more of a reason to make them-Super easy!


Recipe:
1 chocolate cake mix (I used devils food)
1/2 cup vegetable oil
2 eggs
1/3 cup white chocolate chips
1/3 cup semi-sweet chocolate chips
1/3 cup milk chocolate chips
 
*Note: You can sub out any of the chips for butterscotch chips, peanut butter chips, M&M's, peanut butter cups, or even Andes Mints.
 
Preheat your oven to *350. 
 
In a large mixing bowl, mix together the cake mix, oil, and eggs.  Stir till well incorporated. Fold in the chips.  I used a cookie scoop, but if you don't have one just make 1inch balls and place them on a prepared cookie sheet.  (I always bake my cookies on a silicone liner like a Silpat, but if you don't have one you could just use parchment paper. This makes it so the cookies don't stick to the sheet or burn.)
 
Bake for 8-10 minutes.  Let cool on the cookie sheet for a couple of minutes before transferring them to a cooling rack. 
*Makes about 3 dozen cookies.  Store in an airtight container for up to a week.


Saturday, February 23, 2013

Homemade Vanilla Cupcakes with a Vanilla Buttercream

So as you can tell from these pictures, I'm a little late posting about this birthday party we had back in August!  Whoops!  Time has definitely gotten the best of me, but I have been wanting to share this delicious cupcake recipe with you all for quite sometime. 
 
So Lily and her cousin just happen to share the same birthday so my sister in law and I wanted to throw a fun birthday party that the theme could be both girly and boyish at the same time.  So since their birthdays are in August and the weather is still HOT I thought a fun nautical party would fit the bill.  We decorated using pinks, turqoise's, and reds fitting both the girl and boy theme.  The day was so much fun that I forgot to take more photos of the decorations but we just hung a bunch of lanterns from the trees and called it good.
 
The cupcakes were definitely the hit of the party.  I got this recipe from my little sister and I think I had 5 different people ask me for the recipe.  They were so good!  We frosted them with a delicious vanilla buttercream and topped them with fondant anchors and stars.  If your looking to throw a party for both a girl and a boy I highly suggest the Nautical theme. 


Vanilla Cupcakes:
1 cup cake flour
1-1/2 tsp. baking powder
1/2 cup all purpose flour
1 cup sugar
1/4 tsp. salt
1/2 cup unsalted butter (softened)
2 eggs
1/2 cup milk (I prefer whole)
2 tsp. vanilla extract
 
Preheat the oven to *350.  Mix together all the dry ingredients in mixer for 2-3 minutes.  Add the butter and mix till dough forms small crumb like peices.  Add the eggs one at a time making sure they are completely mixed in before you add the next egg.  Slowly add in the milk and vanilla.  Fill liners 2/3 of the way full.  Bake for 17-20 minutes (checking at 17 min. with a toothpick for doneness)
Cool completely before frosting. 
 
Vanilla Buttercream Frosting:
1-1/2 stick unsalted butter (softened)
2 cups powdered sugar
1-1/2 tsp. vanilla
 
Mix all ingredients until smooth.  Frost cupcakes and enjoy. 


 (we also served these oreo cookies and s'more pops)
 

I think its safe to say the birthday kiddos loved the cupcakes :)


Wednesday, June 13, 2012

The Window Garden

Hey Everyone I'm Back!!! It has been way to long since I have posted last, and oh how I have missed it!  So much has happened over the past few months.  We moved back home to Utah for good! It felt like we were never going to make it home, but now when I look back on it all, the time really did just fly by! A month after we moved home, The Hubs had to leave back to Texas to work for the summer :(  Can i just tell you how grateful I was to be back around family and friends!  I do not know how I would've taken raising a 2 year old and being 9 months pregnant on my own without all of their help!

Then on May 8th we welcomed our perfect little baby girl, Halle McKinley.

I like to think that she is the best thing we've cooked up in a long time!
Two weeks after she was born, The Hubs had to return back to Texas to work till August. Gosh, I thought I had my hands full before the baby was born!  It has been a whole new ball game with 2 little girls and no Hubs to help out!!! But Halle has been such a good baby so far and Lily, my 2 year old, has adapted much better to the new baby then I thought she would.  So, as you can see I just haven't had any extra time for this little blog of mine!

Anyways, I would like to share my dads newest product with all of you fellow foodies!  He came up with the wonderful idea to build something, that you could put in most 32-48inch interior windows in your home, that you could grow your herbs, flowers, or house plants on year round.  Its called The Window Garden


 Its the perfect item for those of you who love to cook with fresh herbs year round!  I love it because in our situtaion where we have moved from apartment to apartment in the past with my husbands job, we didn't even have an outdoor space that we could plant our own herbs or flowers in to enjoy. So The Window Garden has been so nice to have for that very reason alone.  Here it is pictured in my Aunts home and I think it's not only practical but it looks so cute to!  If you are interested in purchasing a Window Garden for yourself or someone that you know, CLICK HERE and start your indoor garden today!

Wednesday, February 1, 2012

Cheddar Bay Biscuits

I don't know if you've noticed, but I'm not much of a seafood fan.  I so wish I was, because lets be honest, it can be really healthy and good for you!  One of my New Years Resolutions though was to try new things this year and cooking Seafood is definitely one of them!  So, needless to say, you should be seeing some seafood dishes hopefully in the near future.  (if you all have any recommendations on what type of fish is your favorite and how to cook it, I will definitley take anything you've got!)

Anyways, so the reason I even babbled about all that seafood jibberish is because I LOVE Red Lobsters Cheddar Bay Biscuits.  I don't eat there very often because of my fish disliking, but I crave these biscuits on a regular basis.  They are so full of flavor and they can be paired with so many different meals.  These biscuits are so simple to put together that I'm sure you will find yourselves whipping these up more often that you think :)


Recipe:
2-1/2 cups Bisquick
4 Tbsp. cold butter
1 cup Shredded Cheddar Cheese
3/4 cup milk
1/4 tsp. garlic powder

For the Butter Topping:
3 Tbsp. Butter (melted)
1/2 tsp. garlic powder
1/4 tsp. dried parsley flakes
pinch of salt

Preheat your oven to *400.  In a large bowl, using a pastry blender (or a fork) cut the butter into the bisquick till the mixture becomes crumbly.  Using your hands mix in the cheese, milk, and garlic powder till well incorporated but DO NOT overmix. 

Drop spoonfuls of batter about 1/4 cup in size onto a parchement or silicone lined baking sheet.  Bake for 13-17 minutes until lightly browned on top.

Right before the biscuits are done baking, melt your butter, then combine all the seasonings into the butter.  Right when the biscuits are done, brush a generous amount of the garlic butter over the top of each biscuit.   Makes a dozen biscuits.  Enjoy!

Recipe Source: Top Secret Recipes


Monday, January 30, 2012

Wingers Sticky Fingers

For all of you who don't know what Winger's is, well it's a lovely little diner in Utah, Idaho, and a couple other states and they are know for their spicy wings and "sticky fingers".  Their sticky fingers are delicious chicken fingers drenched in their Famous sauce (aka Freakin Amazing Sauce).  This sauce really does live up to its name of being Freakin Amazing!

I wanted to share my version of these delectable little bites with you because I think these would be a great appetizer or dish to share with friends for the upcoming super bowl.  I made homemade chicken fingers which were super easy and very affordable, but if your in a time crunch you can always use breaded frozen chicken tenders also.

Recipe:
For the Chicken Tenders:
2 boneless skinless chicken breasts
2 cups panko bread crumbs
season salt
1/2 cup flour
1 egg
1/2 cup milk
salt & pepper

For the Sauce:
3/4 cup Franks Hot Sauce (HAS to be Franks!)
1-1/2 cups brown sugar
1/4 cup water
2 Tbsp. Honey

Preheat your oven to *350.  Line a baking sheet with lightly greased foil.

Trim the chicken of any fat.  Slice the chicken widthwise into 6-8 strips.  In 3 seperate bowls, combine the flour and a little salt in the 1st bowl, whisk together egg and milk in the 2nd, and combine the panko bread crumbs and seasoning in the 3rd.  Take each strip and dip into the flour, then egg wash, then dredge in the bread crumbs. Repeat with each strip.

Bake the strips for 25-30 minutes.  While the chicken is baking combine all the ingredients for the sauce together and set aside. 

As soon as the chicken is done baking, pour sauce over each chicken tender till they are completely covered with sauce.  Serve with a side of celery and extra sauce for dipping.

*We like to combine some of the Freaking Amazing Sauce with some Ranch and you've got yourself some Creamy Freaking Amazing Sauce, which Seriously is AMAZING!!!


Recipe Source: Me

Friday, January 27, 2012

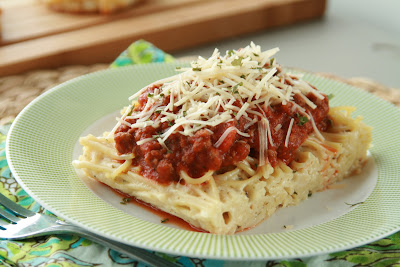
Spasagna

So this pregnancy I haven't had any crazy cravings like you hear some people have.  Like craving laundry detergent, pickles everyday, or I've even heard of some ladies craving dirt?!!!! Weird I know!  But one thing that I have found myself wanting to eat on a regular basis is Spaghetti. 

I absolutley love the combination of marinara and brown butter with mizithra cheese that they have at Spaghetti Factory.  I actually made a version of it the other day that I will share with you at a later time.  But I have to say that this version of spaghetti has become one of our families favorties!  I got the recipe from one of my good blogging buddies Brandie over at The Country Cook. Can I just say that Brandie has so many delicious and quite easy to make recipes that always has me coming back to her blog on a regular basis.  This dish is so full of flavor, so easy to put together, and will easily feed a family of six.


Recipe:
1 lb spaghetti noodles
1 (26oz) jar of your favorite marinara sauce
1 (16oz) jar favorite alfredo sauce
1 lb ground beef or ground turkey
1/2 cup milk
2 cups shredded mozzarella
1 tsp. dried oregano
1 tsp. dried parsely flakes

Cook spaghetti as directed on package.  Preheat oven to *350.  In a large bowl combine the alfredo sauce, milk, shredded cheese, and spices.  When noodles are done cooking, drain them completely then mix them into the alfredo mix.  Lightly grease a 9x13 baking dish and pour the noodles into the pan, cover with foil, and bake for 30 minutes.

While the noodles are baking, cook up the meat till no longer pink.  Drain meat of any excess fat then return to pan.  Stir in the marinara sauce and heat through. Cover and keep on low heat till noodles are ready.

After noodles are done baking, let them sit for about 5-10 minutes.  Cut the noodles into squares and top with some of the marinara meat mixture and sprinkle a bit of parmesan cheese over the top.  Serve with a green salad and some french bread!

Recipe Source: Brandie @ The Country Cook


Wednesday, January 25, 2012

Homemade Fudge Sauce, Peanut Butter, & Banana Milkshake

So Pregnancy does crazy things to you!  Besides what it does to your body, it sometimes causes you to crave the most outrageous things!  For example, I had a craving for chocolate, spaghetti, coconut chicken tenders (which you saw yesterday) and peanut butter all at the same time :)  So needless to say you will be seeing some new recipes over the next week! 

So I wanted to recreate a recipe that I absolutely Loved when I was younger.  Lets just say that only half of the dessert turned out the way that I wanted it to and the other half was a complete failure :(  So, I will just share part of the recipe with you and save the rest of it for another day when it actually turns out! 

Not only am I sharing the milkshake recipe with you but I will be sharing my sister-in-laws AMAZING recipe for homemade fudge sauce (which I used in my milkshake. Pure Heaven!)

Recipe:
For the Homemade Fudge:
1 (14oz) can sweetened condensed milk
1 wrapped square of Bakers unsweetened chocolate (if you don't have Bakers chocolate on hand you can use 1 cup of semi-sweet chocolate chips)
1 stick Butter

Melt the butter in a small saucepan over low-medium heat.  Once the butter is melted, turn the heat off and immediately stir in the chocolate till it melts.  Then stir in the sweetened condensed milk till it is all well combined.  Serve over anything :) Seriously!

Recipe:
For the Milkshake:
1 Pint of Vanilla ice cream
1 medium banana (sliced)
1-1/2 Tbsp. creamy peanut butter
4-5 Tbsp. Homemade Fudge
Milk (I used about 1/4 cup to get the consistency I wanted but you could use less or more depending on the texture that you like)

Mix all the above ingredients together in a blender till smooth. Makes 2 milkshakes. 

*I just realized that I forgot to share with you all that we will be expecting another...
Due the middle of May! We couldn't be more excited!!!

Recipe Source: Fudge Sauce-My sister in law Kim, Milkshake-Me


Related Posts Plugin for WordPress, Blogger...